
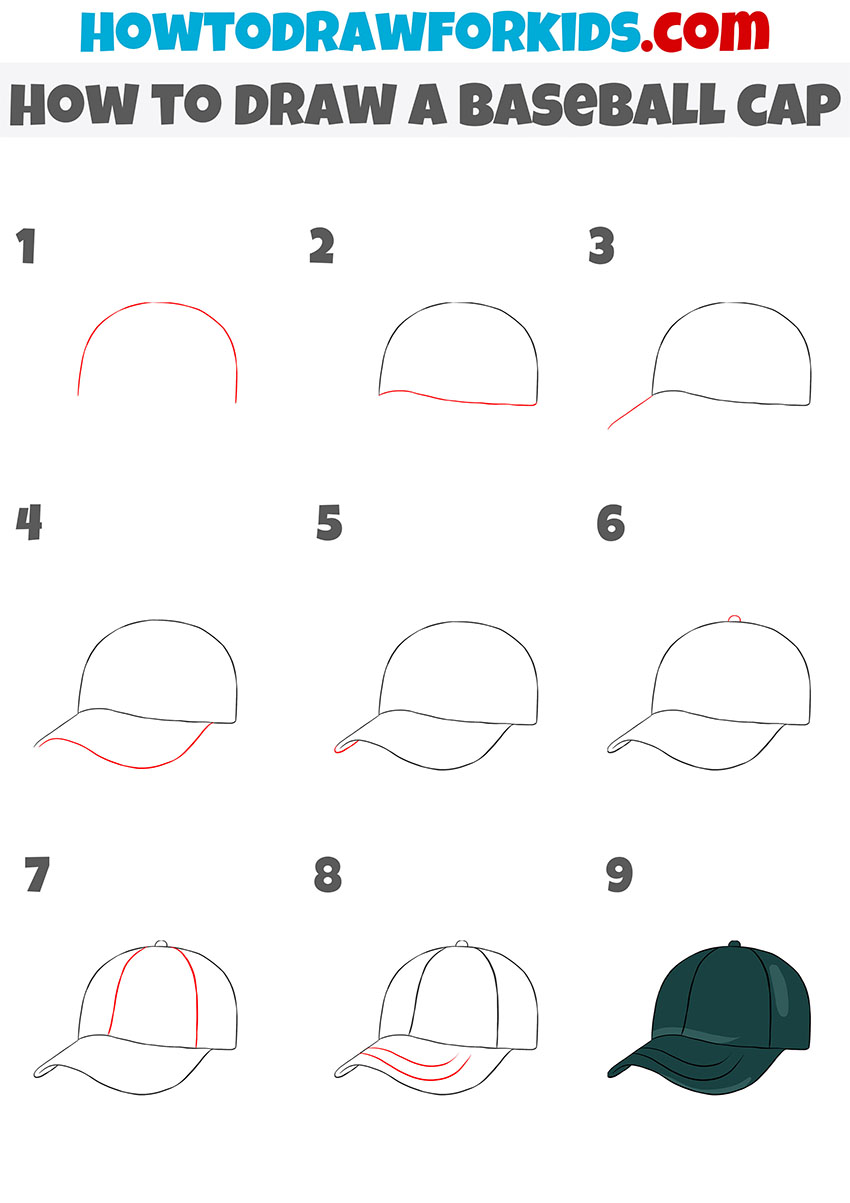
Drawing a baseball cap can seem challenging. But with some guidance, it becomes easy.
This guide will show you how to draw a baseball cap in simple steps. Baseball caps are popular and stylish accessories. They have a specific shape that can be tricky to capture. By following clear instructions, you can master the art of drawing a baseball cap.
This tutorial is perfect for beginners and seasoned artists alike. It focuses on the key elements of the cap: the crown, bill, and details. You will learn to sketch each part accurately. Grab your pencils and paper, and get ready to draw a baseball cap with confidence. Let’s begin your artistic journey!

Credit: www.youtube.com
Materials Needed
Creating a realistic baseball cap drawing starts with having the right materials. Gathering the correct tools and paper ensures you achieve the best results. Here’s what you need to get started.
Drawing Tools
A good pencil is essential for sketching your baseball cap. Choose a medium hardness, like an HB pencil. It provides a balance between light and dark lines. You’ll also need an eraser. A kneaded eraser works well for fine details. For outlining, use fine-tip pens. These add definition to your drawing. Don’t forget a sharpener. Keeping your pencil sharp ensures clean lines.
Paper Types
The type of paper you use can affect your drawing. For beginners, regular printer paper works fine. It’s accessible and affordable. For more advanced artists, try sketch paper. It has a better texture for detailed work. If you plan to add color, use thicker paper. Watercolor paper or mixed media paper are good options. They handle markers and paints without bleeding.
Basic Shapes
Learning to draw a baseball cap starts with understanding basic shapes. These shapes form the foundation of your drawing. They make it easier to add details later. Two key shapes you will use are circles and ovals. Let’s explore these shapes in more detail.
Drawing Circles
Begin with a simple circle. This will be the top of the cap. Use a light pencil stroke. This way, you can erase mistakes easily. Keep your circle as round as possible. A good circle helps the cap look realistic.
Drawing Ovals
Next, draw an oval below the circle. This oval represents the brim of the cap. Make the oval wider than the circle. This will give the cap a proper shape. Draw lightly at first. Adjust the size and shape until it looks right.
Combining these basic shapes creates the base of your baseball cap. Once you have these shapes, you can add more details. The circle and oval guide your hand. They help you draw a better cap.
Sketching The Cap’s Crown
Drawing a baseball cap can be a fun and creative process. One of the essential parts is the cap’s crown. The crown is the top part of the cap that covers the head. It sets the basic shape and structure of the cap. Let’s dive into the details of how to sketch it effectively.
Outlining The Crown
Start with a simple oval shape. This represents the top of the head. Draw this lightly since it will serve as a guide. Next, draw a slightly curved line from one side of the oval to the other. This line marks the bottom of the crown.
To give the crown some depth, draw two vertical lines from the bottom curve upwards. These lines should be slightly curved outward. Connect these lines with another curved line at the top. Now, you have the basic outline of the crown.
Once the basic shape is ready, add more details. First, draw the panels of the crown. Baseball caps often have six panels. Start by drawing a vertical line down the middle of the crown.
Next, draw two lines on each side, equally spaced. These lines should follow the curve of the crown. Add a small circle at the top where all the lines meet. This represents the button on top of the cap.
Finally, add some stitching details. Draw small, evenly spaced lines along each of the panel lines. This will give the crown a realistic look.
| Step | Action |
|---|---|
| 1 | Draw an oval shape for the head. |
| 2 | Sketch a curved line for the crown’s base. |
| 3 | Draw vertical lines for the crown’s sides. |
| 4 | Connect the sides with a curved top line. |
| 5 | Add panel lines and a top button. |
| 6 | Include stitching details. |
Following these steps will help you sketch a realistic baseball cap’s crown. Remember, practice makes perfect. Keep sketching and refining your technique!
Drawing The Brim
Drawing a baseball cap brim adds realism to your sketch. The brim is the front part of the cap. It shades the wearer’s face. This section will guide you through the process.
Creating The Brim Shape
Start with a light pencil sketch. Draw a curved line at the base of the cap. This will be the top edge of the brim. The curve should match the cap’s curve.
Next, draw another curved line parallel to the first. This line will be the bottom edge of the brim. Ensure both curves are smooth. They should taper towards the edges.
Now, connect the ends of the two curves with short lines. This forms the sides of the brim. Your brim shape is now complete. It should look like a thin, curved rectangle.
Adding Depth
To add depth, you need to create the underside of the brim. Start by drawing a line from the bottom edge of the brim. This line should be slightly curved and follow the shape of the brim.
Next, draw a few short lines connecting this new line to the bottom edge of the brim. These lines represent the thickness of the brim. They give the brim a three-dimensional look.
For further detail, you can add stitching lines. Draw parallel lines along the top and bottom edges of the brim. These lines should be close together. They mimic the stitching found on real baseball caps.
| Step | Action |
|---|---|
| 1 | Draw a curved line at the base of the cap. |
| 2 | Draw a parallel curved line below the first. |
| 3 | Connect the ends of both lines with short lines. |
| 4 | Draw the underside of the brim. |
| 5 | Add stitching lines along the edges. |
With these steps, your baseball cap brim will look realistic. Remember to use light strokes first. You can always darken lines later. Happy drawing!
Adding Stitching
Adding stitching to your baseball cap drawing adds detail and realism. It brings your artwork to life. Follow these steps to draw stitch lines and enhance realism.
Drawing Stitch Lines
Start by identifying the main seams on the cap. These are usually around the brim and crown. Draw light, curved lines along these seams. These lines represent the stitches. Keep the lines evenly spaced. This creates a neat appearance. Use short, dashed lines for the stitches. Make them consistent in length.
Enhancing Realism
Observe real baseball caps for reference. Notice how the stitches follow the shape of the cap. Pay attention to the curve of the brim. Mimic this curve in your drawing. This adds a realistic touch. Vary the thickness of the stitch lines. Thicker lines can represent reinforced stitching. This adds depth to your drawing.
Consider the lighting in your drawing. Add subtle shadows around the stitches. This gives the illusion of raised threads. It makes the stitches appear three-dimensional. Practice these techniques. Soon, your baseball cap drawings will look realistic and detailed.
Credit: howtodrawforkids.com
Adding Details
Adding details to your baseball cap drawing can make it stand out. These details give the cap a realistic and unique look. Focus on embellishments and logo placement to enhance your drawing.
Embellishments
Embellishments add character to your baseball cap drawing. Start with the stitching on the panels. Draw small, even lines along the seams. This gives the cap texture. Next, add the eyelets. These are small holes on the top of the cap. Draw small circles evenly spaced around the crown.
Include the button at the top. This is a small circle where the panels meet. Finally, draw the stitching on the brim. Use short, parallel lines following the curve of the brim. These details make your drawing more lifelike.
Logo Placement
A logo can make your baseball cap unique. Choose a simple design for the logo. Place the logo on the front of the cap. This is the most common location. Draw a small circle or square as a guide. Inside this guide, sketch your logo.
Ensure the logo is centered and proportional. You can also add text above or below the logo. Keep the text simple and easy to read. This enhances the cap’s design and makes it look professional.
Shading Techniques
Shading adds depth to your baseball cap drawing. It brings your art to life. Understanding shading techniques is crucial. This section will guide you through essential shading methods.
Light Source
First, decide the light source. This affects where shadows fall. Think of the light as a sun or a lamp. Imagine how it hits the cap. Highlight the area facing the light. The opposite side will be darker.
Use light, gentle strokes for highlights. Keep them soft and even. This creates a natural look. The brim and top of the cap usually catch the most light. Pay attention to these areas.
Creating Shadows
Shadows give your drawing dimension. Start with the darkest areas. Use a pencil or shading tool. Apply more pressure for darker shadows. Use less pressure for lighter shadows.
Blend the edges of the shadows. This creates a smooth transition. Shadows should not have sharp lines. They should fade gradually. The underside of the brim and the sides of the cap are common shadow areas.
Consider the shape of the cap. Shadows follow its curves. Observe real baseball caps for reference. This helps you understand where shadows naturally fall.

Credit: www.youtube.com
Final Touches
In this section, we will focus on the final touches of drawing a baseball cap. These steps ensure your drawing looks polished and complete. We will review proportions and clean up lines to make your cap look professional.
Reviewing Proportions
First, take a moment to review the proportions of your drawing. Ensure the cap’s bill aligns well with the head. Check the size of the cap relative to the head. It should not look too big or too small.
Compare the width and height of the cap. The bill should be wider than the cap itself. Use a ruler or straightedge if needed. This helps in keeping the dimensions accurate.
Cleaning Up Lines
Now, let’s focus on cleaning up the lines. Start by erasing any extra lines. These are often the guidelines used in the initial stages. They should no longer be visible.
Go over the main lines with a darker pencil or pen. This makes the drawing look clean and sharp. Be careful to keep your lines smooth and steady. Uneven lines can make the drawing look messy.
Finally, add small details such as stitches on the cap. These tiny details can make a big difference. They add a touch of realism to your drawing.
| Step | Description |
|---|---|
| Review Proportions | Ensure the cap size and bill align with the head. |
| Clean Up Lines | Erase guidelines and darken main lines. |
| Add Details | Include stitches and other small elements. |
By following these final touches, your baseball cap drawing will look complete and professional.
Frequently Asked Questions
How Do You Start Drawing A Baseball Cap?
To start drawing a baseball cap, begin with a simple oval shape for the crown and a curved line for the brim.
What Tools Do I Need To Draw A Cap?
You will need a pencil, eraser, paper, and optionally, colored pencils or markers to add color.
How Do You Draw The Brim Of A Baseball Cap?
Draw a curved line extending from the crown. Make sure it follows the natural curve of the cap.
How Can I Make My Drawing Look Realistic?
Add shading and details like stitching and logos. Use reference images to capture accurate proportions and textures.
Conclusion
Drawing a baseball cap can be fun and easy. Follow the steps outlined, and you’ll improve quickly. Practice makes perfect, so keep drawing. Use simple shapes and lines to start. Add details as you gain confidence. Soon, your baseball caps will look realistic.
Share your progress with friends and family. Keep exploring different styles and techniques. Enjoy the process and have fun creating!